" d="M280.37 148.26L96 300.11V464a16 16 0 0 0 16 16l112.06-.29a16 16 0 0 0 15.92-16V368a16 16 0 0 1 16-16h64a16 16 0 0 1 16 16v95.64a16 16 0 0 0 16 16.05L464 480a16 16 0 0 0 16-16V300L295.67 148.26a12.19 12.19 0 0 0-15.3 0zM571.6 251.47L488 182.56V44.05a12 12 0 0 0-12-12h-56a12 12 0 0 0-12 12v72.61L318.47 43a48 48 0 0 0-61 0L4.34 251.47a12 12 0 0 0-1.6 16.9l25.5 31A12 12 0 0 0 45.15 301l235.22-193.74a12.19 12.19 0 0 1 15.3 0L530.9 301a12 12 0 0 0 16.9-1.6l25.5-31a12 12 0 0 0-1.7-16.93z"/%3E%3C/svg%3E)

Small Intro
![]()
This article tries to demonstrate how to setup an AWS (EC2) instance, installing a LEMP stack, preparing the server environment to meet Magento’s requirements and then to finally install Magento v2 using commandline approach.
While, I completely agree that:
– you can use any other VPS
– you can git clone using https and hence no need for github ssh key binding
– you can install magento simply via using it’s web interface by pointing your browser to your http://yourdomain.com/setup
I’m presenting in this article something which might otherwise seem to be a daunting approach – but I also see it as an approach which you can later automate by using Docker/Dockerfile for example or even using a Vagrant appliance. (Btw my buddy and colleague Max Bucknell (@maxbucknell) made short and effective screencast on using vagrant for installing Magentov2 – click)
A Word About Magento’s Devdocs website
Magento is doing an good job with the new spirit that is in the form of the magentov2 devdocs – click. This knowledge-base is my main reference for magento 2. But please help in anyway you can to keep it updated and also improve it, you can easily submit pull request via github as devdocs is hosted in there.
Assumptions
- You do have some basic knowledge with DevOps or Linux Server stuffs
- You know how to use Composer
- You have knowledge of SSH Keys / Key Pairs usage
- You have a github account – create one if no, it’s free
- I’m using Nginx as server, but you can easily adapt for Apache
Note: Since this article is quite lengthy in its aim, I’ll be a bit straight forward with things that you can figure out by googling / your intuition.
Objectives With This Article
- Create a Free AWS account
- Preparing & Configuring your AWS EC2 Instance
- Binding SSH key with Github
- Installing Magento v2 via Command Line
Let’s do this!
Creating a Free Tier AWS Account
AWS (An Amazon service), I believe is the only high calibre VPS in this ecosystem to provide a top notch VPS Instance for Free for One full year with the following specs (of interest to me):
- 750 hours per month of Linux
- 1 GiB of memory (RAM)
- 32-bit and 64-bit platform support
- 30 GB of Amazon Elastic Block Storage in any combination of General Purpose (SSD) or Magnetic, plus 2 million I/Os
- 1 GB of snapshot storage
- 15 GB of bandwidth out aggregated across all AWS services
I don’t know about you, but this is largely (and insanely) sufficient for my DEV server needs and to test out anything I would like. But wait, there’s even more – see the full specs and all related Services here – click! (No, there’s no referral here)
NOTE:
For the faint-heart, creating a free account with AWS Free Tier package, is not a quick process. It took around 4 days for me. Why?
When you create your account, AWS is kinda strict so that you will need to provide accurate infos about:
1) Yourself – name, physical address, phone..etc
2) a valid working credit card – they will deduce a random (small) amount to verify your card & hence confirming your identity
The credit card is also there for AWS to bill you in case you want to go overboard of what they are currently offering for the Free package – AWS is flexible and elastic in almost all their products – each of them are really decoupled.
Preparing & Configuring your AWS EC2 Instance
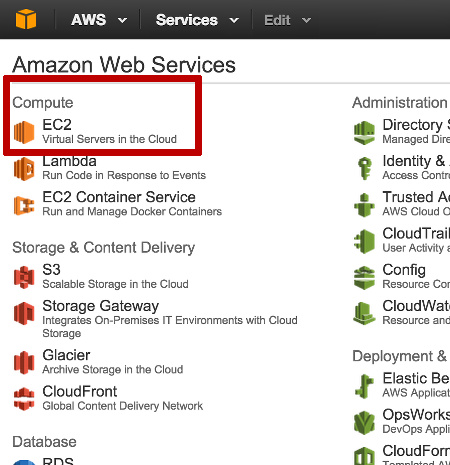
The partial screenshot above show how the AWS dashboard looks like. Of interest to us, is the EC2 sub-menu highlighted by the red rectangular box.
When using an AWS Instance, you will need to go through the following most important steps:
- Create a security group
- Create a PEM file – Key Pairs
- Create Your Instance
- Create an Elastic IP & assign to the created instance
- Assign a custom domain or subdomain to that (elastic) IP (optional, since you can just use the IP)
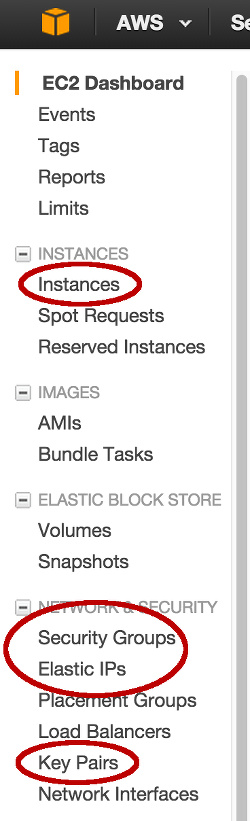
Creating A Security Group For Our AWS EC2 Instance
In the menu above, click on Security Groups under Network sub-menu. A popup like the screenshot below will be shown to you. Here, I’ll add only two rules for our EC2 instance to be accessible over SSH and over normal HTTP. And note that for both, I have also set the rule so that it is accessible by anyone anywhere – but if you want your instance to remain private, just put some IP restriction in there.
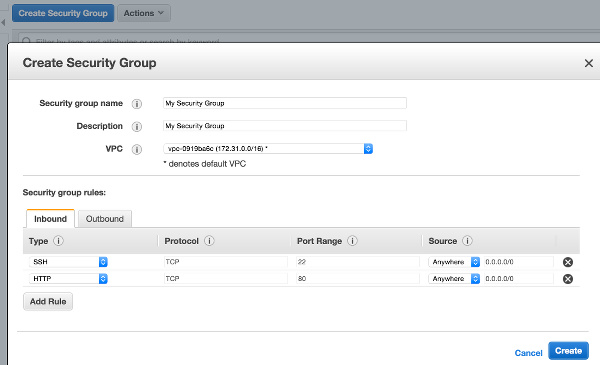
After you click the Create button, you will be asked to download the generated PEM file. Please save it somewhere safe & handy as this is your central Key to accessing your instance.
Creating a PEM file – Key Pairs
Select Key Pairs on the left-menu, you will be presented with a popup similar to the below and simply provide a name for it:

What’s a PEM File?
Normally when you access a remote server over SSH using a terminal, you would access it by using a combination of login/password, e.g:
$ ssh user@the-ip-address -p [PORT]
But with AWS, this is not possible when you first create an instance. I said first, because after you use a PEM file, you can setup your box to be SSH-accessible using login/password.
AWS adds an extra security layer by requiring you to create and use a PEM file – about AWS PEM files! In essence, if you know about ‘SSH-Keys private/public‘ usage, you are fine with pem files.
For info, when connecting with a PEM file you would do something like:
$ ssh -i /path/to/your_aws_pem_file.pem user@the-ip-address-of-your-instance
Creating our AWS EC2 Instance
Select Instances on the left-menu. Then once on the Instances page, select the big blue button saying “Launch Instance“. You will be presented with a list of linux flavors to choose from. And you will be taken to the following STEPS:
STEP 1 – Choose an Amazon Machine Image (AMI)
I have chosen “Ubuntu Server 14.04 LTS (HVM), SSD Volume Type“.
STEP 2 – Choose an Instance Type
I selected the first one, that is, general purpose/t2.micro
STEP 3 – Configure Instance Details
I selected all the default ones, nothing special at this step
STEP 4 – Add Storage
I have chosen 12 GB / General Purpose SSD. You stick with the default 8 GB, that’s fine. You do have 30 GB a free-tier though.
STEP 5 – Tag Instance
This is just for your own use. I usually tag it with the following three tags:
Name => Magento Instance
Author => Wasseem
Purpose => DEV
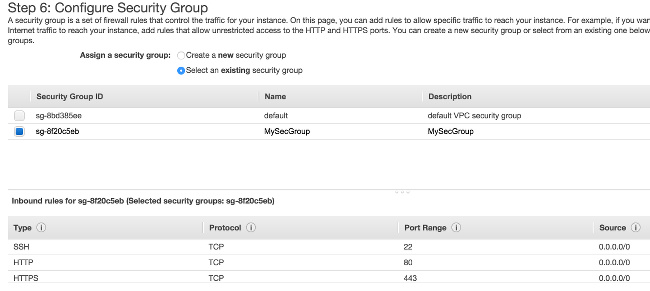
STEP 6 – Configure Security Group
This sounds familiar, aye! Yes we already created this above. But now at this step we will use it! So please choose “existing security group” for the section ‘Assign a security group‘. See screenshot below:
STEP 7 – Review Instance Launch
This is the final step, please review all your configuration. Once satisfied, click launch and let’s rock!
Creating an Elastic IP & Assigning to our EC2 Instance
Assuming everything went fine, you will see your instance listed as a Running instance, with a random public IP on the Instances Page. Now we need to create and assign an Elastic IP to it.
So on the left-menu, select Elastic IP. Once there, create one and associate with your Running Instance.

Why Elastic IP?
When you create an elastic IP, the generated IP is reserved for you each time. If you don’t use it and rely on dynamic public IP generation/association, each time when you stop your instance and restart it, you lose the previous IP – this proved to be a downside to our use-case:
i) since we will configure our Magento installation to use an IP
ii) in case we are using a custom domain or subdomain, we will need to re-update them and wait for DNS propagation delays…etc
So in brief, an elastic IP is really helpful.
Preparing & Configuring our AWS EC2 Instance
Accessing Our Instance First Time
Ok, now time for the 2nd dive, let’s SSH into our created instance. Before we proceed, note that I have assigned a subdomain to my elastic IP. This is done at your Domain Registrar’s dashboard. I have set an A-record for the following:
m2.7php.com => [the_elastic_IP]
Let’s SSH, see my terminal’s screenshot below:
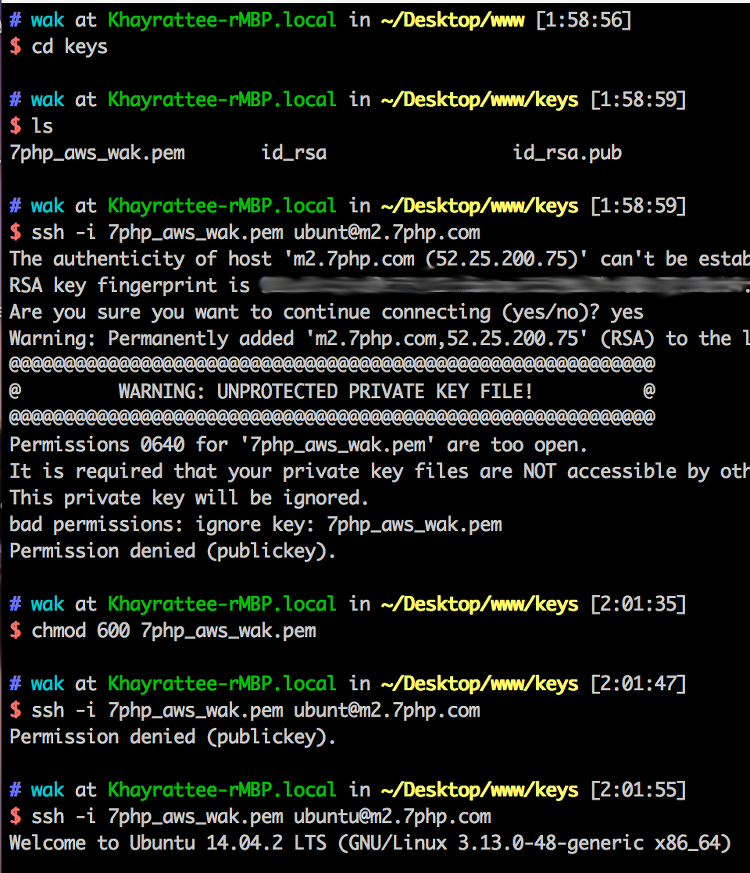
Some points:
- I change directory to the place where my PEM file resides
- I then try to SSH into my instance
- You will note the prompt: “Are you sure you want to continue connecting (yes/no)?” –> type yes.
- You will note a 1st issue: “permissions 0640 for ‘7php_aws_wak.pem’ are too open” –> Well just put it at 600
Installing Our LEMP Stack
Before installing your LEMP (or LAMP) stack, it’s good upfront to know what server requirements Magento adheres to! See Magento 2 Devdocs Server Requirements for additional info.
STEP 1 – Installing MariaDB for our DB needs
Note:
i) I use MariaDB as a substitute for MySQL, but you can use MySQL or even Percona which is an excellent dropin replacement for MySQL.
ii) Magento 2 has as prerequisite of MySQL version 5.6, NOT 5.5!! So the equivalent 5.6 for MariaDB is version 10.
Here’s the commands I used:
$ sudo apt-get install software-properties-common
$ sudo apt-key adv --recv-keys --keyserver hkp://keyserver.ubuntu.com:80 0xcbcb082a1bb943db
$ sudo add-apt-repository 'deb http://mirror.zol.co.zw/mariadb/repo/10.0/ubuntu trusty main'

$ sudo apt-get update

$ sudo apt-get install mariadb-server -y
Note, for Lines 1-3, you will need to get yours from MariaDB’s site: https://downloads.mariadb.org/mariadb/repositories/#mirror=zol
THOUGHT:
To have a more secure installation, run: $ mysql_secure_installation
STEP 2 – Installing Nginx
Pretty simple:
$ sudo apt-get install nginx -y
STEP 3 – Installing PHP
We will Need to use PHP-FPM because we are using Nginx.
For info, Magento needs the following PHP extensions to be installed:
- gd
- mcrypt
- mhash
- mbstring
- intl
- xsl
- simplexml
- soap
- curl
- pdo / mysql
So my installation statements look like this:
$ sudo apt-get install libcurl3 curl -y
$ sudo apt-get install php5-fpm php5-mhash php5-mcrypt php5-curl php5-cli php5-mysql php5-gd php5-xsl php5-json php5-intl php-pear php5-dev php5-common php-soap --fix-missing -y
Solving The ‘mcrypt’ Issue
I have installed PHP-FPM like the above on several AWS instance, DigitalOcean box and even locally on my machine, but each time mcrypt extension is not enabled by default. (If you know why, please shoot me a comment)
To do this, we need to enable mcrypt for both server php and cli php:
$ cd /etc/php5/fpm/conf.d
$ sudo ln -s ../../mods-available/mcrypt.ini

$ cd /etc/php5/cli/conf.d
$ sudo ln -s ../../mods-available/mcrypt.ini
Configuring PHP.ini Settings
Ok, now time to update some php.ini settings to handle magento.
You will need to update the php.ini for both server & cli:
– /etc/php5/cli/php.ini
– /etc/php5/fpm/php.ini
Update for the following:
memory_limit = 512M
max_execution_time = 18000
flag session.auto_start = off
zlib.output_compression = on
And since we are installing for a DEV environment, make sure to enable ‘showing us any error happening‘:
display_errors = on
error_reporting = E_ALL
Aand finally, don’t forget to restart PHP FPM:
$ sudo service php5-fpm restart
Installing Some More Utilities/Tools
Installing GIT
$ sudo apt-get install git -y
Installing Composer
Install composer and place in your ENV Path.
I change directory to /tmp because it’s a folder that has read/write permissions and I use it as a place where I do all quick dirty stuffs. So I first download composer which is the quick dirty task, dirty because the downloaded composer file will ultimately be placed somewhere else.
$ cd /tmp
$ curl -sS https://getcomposer.org/installer | php
$ sudo mv composer.phar /usr/local/bin
Test if composer has been correctly setup: $ composer.phar –help
The Magento 2 Project Installation Walkthrough
Now high time for our deep dive, installing Magento 2.
Things to do at this point now:
- Fetching the Magento 2 repo from github
- Configuring an nginx conf file to handle our magento site/shop installation
- Creating a database
- Running & installing the magento setup
Fetching the Magento 2 repo from github
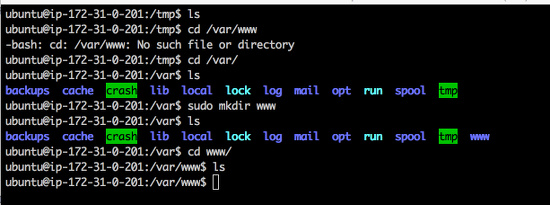
Create /var/www
Let’s change directory to /var/www/
You will note that the directory www inside /var/ does not exist, so create it. See screenshot:
Use SSH for GIT clone, instead of normal https
1) Create an SSH key locally on the instance, see screenshot:
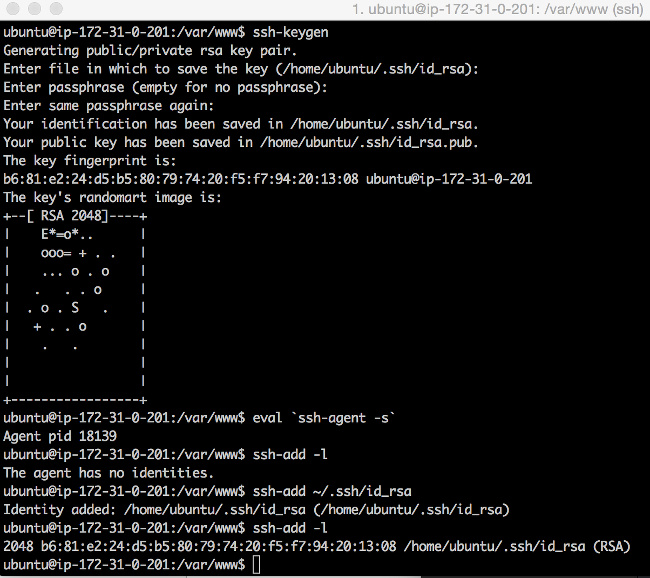
If you have no clue of what I did in the screenshot above, ssh key/pair gen.
If for any reason you messed up a file in the project, just do a GIT reset: $ git reset –hard HEAD
Pitfall
Something worthwhile to note here, when you are generating and binding the ssh key, you are doing it as the user ubuntu on the server. So when later below you will sudo git, you will get a permission issue. This is because as the user root (sudoer), your root ssh key is not running in the ssh-agent. So I would recommend you ‘sudo -s‘ and then do the step above – this will be your homework 😀
2) Bind our public SSH key with our github account.
– Obtain the public ssh-key using the command:
$ cat ~/.ssh/id_rsa.pub
– Then copy and paste the output from the above and save it on our github’s SSH (Settings > SSH Keys > Add SSH Keys)
3) GIT Clone magento from github:
$ cd /var/www
$ sudo git clone git@github.com:magento/magento2.git
Installing Magento Dependencies via Composer
Ok, now that we have the magento 2 project locally, let’s use composer to install all it’s dependencies.
We’ll run composer install since magento also committed their lock file.
$ cd magento2
$ sudo composer.phar install -v
Suggested reading: http://devdocs.magento.com/guides/v1.0/install-gde/install/composer-clone.html
File/Folder Permissions & Owner
Some server business is still unfinished, we need to know what user the server is running with: $ ps -ef | grep nginx
# file/folder permissions
$ sudo find . -type d -exec chmod 700 {} \; && find . -type f -exec chmod 600 {} \;

# set the correct owner
$ sudo chown -R www-data .
If you don’t do this, you end up with an errored page: “The page isn’t redirecting properly”
Configuring nginx conf file to serve our magento site
First thing first: Magento puts in a nice sample conf file in its project directory, named as nginx.conf.sample.
I will use that file. I see no point in renaming it into nginx.conf in a DEV environment. So I’ll keep it ‘as-is’ and ‘where-it-is’.
The idea is to create a conf file (let’s name it as m2.7php.conf) in /etc/nginx/sites-available and then reference the nginx.conf.sample
## FILE m2.7php.conf ##

upstream fastcgi_backend {
server unix:/var/run/php5-fpm.sock;
}
server {
listen 80;
server_name m2.7php.com;
set $MAGE_ROOT /var/www/magento2;
set $MAGE_MODE developer;
include /var/www/magento2/nginx.conf.sample;
}
Note:
– Obtain the full path to the magento project folder, mine was at: /var/www/magento2
Let’s see this into action:
$ cd /etc/nginx/sites-available/

#I assume you have pasted the content for m2.7php.conf
$ nano m2.7php.conf

#we need to symlink to enable the new conf file for m2.7php.conf
$ cd ../sites-enabled/
$ ln -s ../sites-available/m2.7php.conf

#here we are making sure the conf files are all fine
$ service nginx configtest
* Testing nginx configuration [ OK ]

$ service nginx restart
So far, things should be fine..
Creating a Database For Our Magento Installation
We will need to create one and let’s name it as magento2. Here’s the script:
$ mysql -u[user] -p[password]
$ create database magento2;
$ exit;
Of course you will need to put your user instead of [user].
THOUGHT:
Consider creating a user and assign that user with rights to only the database magento2. Don’t use the default root user.
Running The Magento Setup From Commandline
Ok, here’s the script to run:
$ sudo -s

$ bin/magento setup:install --backend-frontname="admin" \
--key="R9uzZ8p62369PI4maG4iApWlwUNSzbBL" \
--db-host="localhost" \
--db-name="magento2" \
--db-user="user" \
--db-password="somepassword" \
--language="en_US" \
--currency="USD" \
--timezone="America/Chicago" \
--use-rewrites=1 \
--use-secure=0 \
--base-url="http://m2.7php.com" \
--base-url-secure="https://m2.7php.com" \
--admin-user=adminuser \
--admin-password=somepassword \
--admin-email=youremail@domain.com \
--admin-firstname=Wasseem \
--admin-lastname=Khayrattee \
--cleanup-database
Note:
– Run the command as root user
– For the hashed key, use an online generator to get one, example: http://randomkeygen.com/
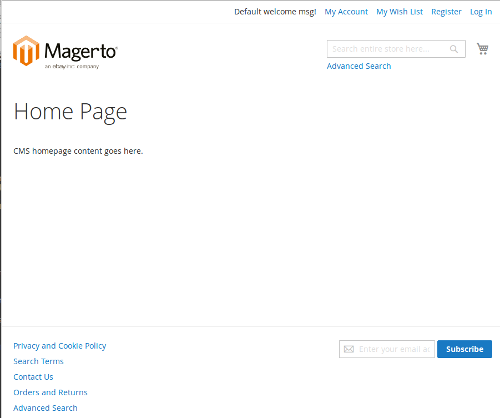
[SUCCESS]: Magento installation complete.
VOILA! If everything went fine, you should have seen the above green message on your terminal.
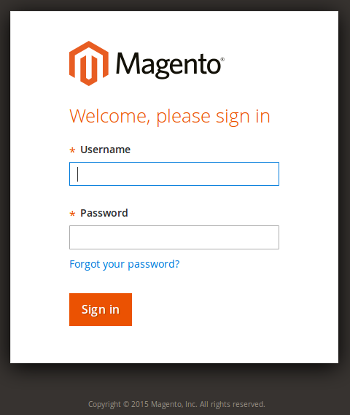
The Frontend node looks like this:
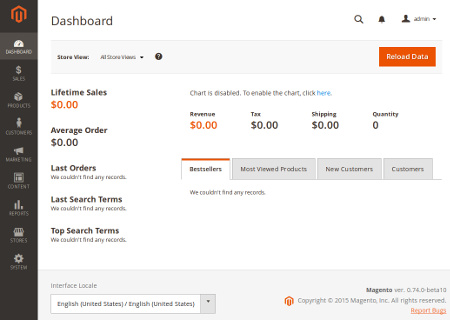
And the Backend node looks like:
For your curiosity. here’s part of the output, I say part because the first block was eaten by my terminal 😉
[Progress: 59 / 272]
Module 'Magento_Centinel':
[Progress: 60 / 272]
Module 'Magento_Persistent':
Installing schema..
[Progress: 61 / 272]
Module 'Magento_ProductAlert':
Installing schema..
[Progress: 62 / 272]
Module 'Magento_Captcha':
Installing schema..
[Progress: 63 / 272]
Module 'Magento_Reports':
Installing schema..
[Progress: 64 / 272]
Module 'Magento_RequireJs':
[Progress: 65 / 272]
Module 'Magento_Review':
Installing schema..
[Progress: 66 / 272]
Module 'Magento_Rss':
[Progress: 67 / 272]
Module 'Magento_CatalogWidget':
[Progress: 68 / 272]
Module 'Magento_GoogleAdwords':
[Progress: 69 / 272]
Module 'Magento_OfflineShipping':
Installing schema..
[Progress: 70 / 272]
Module 'Magento_GiftMessage':
Installing schema..
[Progress: 71 / 272]
Module 'Magento_CatalogSearch':
Installing schema..
[Progress: 72 / 272]
Module 'Magento_Sendfriend':
Installing schema..
[Progress: 73 / 272]
Module 'Magento_Shipping':
[Progress: 74 / 272]
Module 'Magento_Sitemap':
Installing schema..
[Progress: 75 / 272]
Module 'Magento_AdminNotification':
Installing schema..
[Progress: 76 / 272]
Module 'Magento_Tax':
Installing schema..
[Progress: 77 / 272]
Module 'Magento_TaxImportExport':
[Progress: 78 / 272]
Module 'Magento_CatalogUrlRewrite':
Installing schema..
[Progress: 79 / 272]
Module 'Magento_Translation':
Installing schema..
[Progress: 80 / 272]
Module 'Magento_Ui':
[Progress: 81 / 272]
Module 'Magento_Ups':
[Progress: 82 / 272]
Module 'Magento_UrlRewrite':
Installing schema..
[Progress: 83 / 272]
Module 'Magento_Integration':
Installing schema..
[Progress: 84 / 272]
Module 'Magento_Usps':
[Progress: 85 / 272]
Module 'Magento_Variable':
Installing schema..
[Progress: 86 / 272]
Module 'Magento_Version':
[Progress: 87 / 272]
Module 'Magento_Webapi':
[Progress: 88 / 272]
Module 'Magento_Weee':
Installing schema..
[Progress: 89 / 272]
Module 'Magento_CurrencySymbol':
[Progress: 90 / 272]
Module 'Magento_Wishlist':
Installing schema..
[Progress: 91 / 272]
Schema post-updates:
Module 'Magento_Store':
[Progress: 92 / 272]
Module 'Magento_Directory':
[Progress: 93 / 272]
Module 'Magento_Backend':
[Progress: 94 / 272]
Module 'Magento_Backup':
[Progress: 95 / 272]
Module 'Magento_Theme':
[Progress: 96 / 272]
Module 'Magento_CacheInvalidate':
[Progress: 97 / 272]
Module 'Magento_Eav':
[Progress: 98 / 272]
Module 'Magento_Customer':
[Progress: 99 / 272]
Module 'Magento_CatalogImportExport':
[Progress: 100 / 272]
Module 'Magento_Indexer':
[Progress: 101 / 272]
Module 'Magento_Cms':
[Progress: 102 / 272]
Module 'Magento_Search':
[Progress: 103 / 272]
Module 'Magento_Catalog':
[Progress: 104 / 272]
Module 'Magento_Rule':
[Progress: 105 / 272]
Module 'Magento_CatalogInventory':
[Progress: 106 / 272]
Module 'Magento_Payment':
[Progress: 107 / 272]
Module 'Magento_CheckoutAgreements':
[Progress: 108 / 272]
Module 'Magento_Quote':
[Progress: 109 / 272]
Module 'Magento_CmsUrlRewrite':
[Progress: 110 / 272]
Module 'Magento_Config':
[Progress: 111 / 272]
Module 'Magento_ConfigurableImportExport':
[Progress: 112 / 272]
Module 'Magento_Msrp':
[Progress: 113 / 272]
Module 'Magento_Contact':
[Progress: 114 / 272]
Module 'Magento_Cookie':
[Progress: 115 / 272]
Module 'Magento_Cron':
[Progress: 116 / 272]
Module 'Magento_Widget':
[Progress: 117 / 272]
Module 'Magento_Bundle':
[Progress: 118 / 272]
Module 'Magento_CustomerImportExport':
[Progress: 119 / 272]
Module 'Magento_DesignEditor':
[Progress: 120 / 272]
Module 'Magento_Developer':
[Progress: 121 / 272]
Module 'Magento_Dhl':
[Progress: 122 / 272]
Module 'Magento_Authorization':
[Progress: 123 / 272]
Module 'Magento_Downloadable':
[Progress: 124 / 272]
Module 'Magento_SalesSequence':
[Progress: 125 / 272]
Module 'Magento_Email':
[Progress: 126 / 272]
Module 'Magento_Fedex':
[Progress: 127 / 272]
Module 'Magento_Sales':
[Progress: 128 / 272]
Module 'Magento_Checkout':
[Progress: 129 / 272]
Module 'Magento_GoogleAnalytics':
[Progress: 130 / 272]
Module 'Magento_GoogleOptimizer':
[Progress: 131 / 272]
Module 'Magento_GoogleShopping':
[Progress: 132 / 272]
Module 'Magento_GroupedImportExport':
[Progress: 133 / 272]
Module 'Magento_GroupedProduct':
[Progress: 134 / 272]
Module 'Magento_ImportExport':
[Progress: 135 / 272]
Module 'Magento_CatalogRule':
[Progress: 136 / 272]
Module 'Magento_User':
[Progress: 137 / 272]
Module 'Magento_LayeredNavigation':
[Progress: 138 / 272]
Module 'Magento_Log':
[Progress: 139 / 272]
Module 'Magento_MediaStorage':
[Progress: 140 / 272]
Module 'Magento_ConfigurableProduct':
[Progress: 141 / 272]
Module 'Magento_Multishipping':
[Progress: 142 / 272]
Module 'Magento_Newsletter':
[Progress: 143 / 272]
Module 'Magento_OfflinePayments':
[Progress: 144 / 272]
Module 'Magento_SalesRule':
[Progress: 145 / 272]
Module 'Magento_PageCache':
[Progress: 146 / 272]
Module 'Magento_Centinel':
[Progress: 147 / 272]
Module 'Magento_Persistent':
[Progress: 148 / 272]
Module 'Magento_ProductAlert':
[Progress: 149 / 272]
Module 'Magento_Captcha':
[Progress: 150 / 272]
Module 'Magento_Reports':
[Progress: 151 / 272]
Module 'Magento_RequireJs':
[Progress: 152 / 272]
Module 'Magento_Review':
[Progress: 153 / 272]
Module 'Magento_Rss':
[Progress: 154 / 272]
Module 'Magento_CatalogWidget':
[Progress: 155 / 272]
Module 'Magento_GoogleAdwords':
[Progress: 156 / 272]
Module 'Magento_OfflineShipping':
[Progress: 157 / 272]
Module 'Magento_GiftMessage':
[Progress: 158 / 272]
Module 'Magento_CatalogSearch':
[Progress: 159 / 272]
Module 'Magento_Sendfriend':
[Progress: 160 / 272]
Module 'Magento_Shipping':
[Progress: 161 / 272]
Module 'Magento_Sitemap':
[Progress: 162 / 272]
Module 'Magento_AdminNotification':
[Progress: 163 / 272]
Module 'Magento_Tax':
[Progress: 164 / 272]
Module 'Magento_TaxImportExport':
[Progress: 165 / 272]
Module 'Magento_CatalogUrlRewrite':
[Progress: 166 / 272]
Module 'Magento_Translation':
[Progress: 167 / 272]
Module 'Magento_Ui':
[Progress: 168 / 272]
Module 'Magento_Ups':
[Progress: 169 / 272]
Module 'Magento_UrlRewrite':
[Progress: 170 / 272]
Module 'Magento_Integration':
[Progress: 171 / 272]
Module 'Magento_Usps':
[Progress: 172 / 272]
Module 'Magento_Variable':
[Progress: 173 / 272]
Module 'Magento_Version':
[Progress: 174 / 272]
Module 'Magento_Webapi':
[Progress: 175 / 272]
Module 'Magento_Weee':
[Progress: 176 / 272]
Module 'Magento_CurrencySymbol':
[Progress: 177 / 272]
Module 'Magento_Wishlist':
[Progress: 178 / 272]
[Progress: 179 / 272]
Installing user configuration...
[Progress: 180 / 272]
Installing data...
Data install/update:
Module 'Magento_Store':
[Progress: 181 / 272]
Module 'Magento_Directory':
Installing data..
[Progress: 182 / 272]
Module 'Magento_Backend':
[Progress: 183 / 272]
Module 'Magento_Backup':
[Progress: 184 / 272]
Module 'Magento_Theme':
Installing data..
[Progress: 185 / 272]
Module 'Magento_CacheInvalidate':
[Progress: 186 / 272]
Module 'Magento_Eav':
Installing data..
[Progress: 187 / 272]
Module 'Magento_Customer':
Installing data..
[Progress: 188 / 272]
Module 'Magento_CatalogImportExport':
[Progress: 189 / 272]
Module 'Magento_Indexer':
[Progress: 190 / 272]
Module 'Magento_Cms':
Installing data..
[Progress: 191 / 272]
Module 'Magento_Search':
[Progress: 192 / 272]
Module 'Magento_Catalog':
Installing data..
[Progress: 193 / 272]
Module 'Magento_Rule':
[Progress: 194 / 272]
Module 'Magento_CatalogInventory':
Installing data..
[Progress: 195 / 272]
Module 'Magento_Payment':
[Progress: 196 / 272]
Module 'Magento_CheckoutAgreements':
[Progress: 197 / 272]
Module 'Magento_Quote':
Installing data..
[Progress: 198 / 272]
Module 'Magento_CmsUrlRewrite':
[Progress: 199 / 272]
Module 'Magento_Config':
Installing data..
[Progress: 200 / 272]
Module 'Magento_ConfigurableImportExport':
[Progress: 201 / 272]
Module 'Magento_Msrp':
Installing data..
[Progress: 202 / 272]
Module 'Magento_Contact':
[Progress: 203 / 272]
Module 'Magento_Cookie':
[Progress: 204 / 272]
Module 'Magento_Cron':
[Progress: 205 / 272]
Module 'Magento_Widget':
Installing data..
[Progress: 206 / 272]
Module 'Magento_Bundle':
Installing data..
[Progress: 207 / 272]
Module 'Magento_CustomerImportExport':
[Progress: 208 / 272]
Module 'Magento_DesignEditor':
[Progress: 209 / 272]
Module 'Magento_Developer':
[Progress: 210 / 272]
Module 'Magento_Dhl':
Installing data..
[Progress: 211 / 272]
Module 'Magento_Authorization':
Installing data..
[Progress: 212 / 272]
Module 'Magento_Downloadable':
Installing data..
[Progress: 213 / 272]
Module 'Magento_SalesSequence':
Installing data..
[Progress: 214 / 272]
Module 'Magento_Email':
[Progress: 215 / 272]
Module 'Magento_Fedex':
Installing data..
[Progress: 216 / 272]
Module 'Magento_Sales':
Installing data..
[Progress: 217 / 272]
Module 'Magento_Checkout':
Installing data..
[Progress: 218 / 272]
Module 'Magento_GoogleAnalytics':
[Progress: 219 / 272]
Module 'Magento_GoogleOptimizer':
[Progress: 220 / 272]
Module 'Magento_GoogleShopping':
Installing data..
[Progress: 221 / 272]
Module 'Magento_GroupedImportExport':
[Progress: 222 / 272]
Module 'Magento_GroupedProduct':
Installing data..
[Progress: 223 / 272]
Module 'Magento_ImportExport':
[Progress: 224 / 272]
Module 'Magento_CatalogRule':
Installing data..
[Progress: 225 / 272]
Module 'Magento_User':
[Progress: 226 / 272]
Module 'Magento_LayeredNavigation':
[Progress: 227 / 272]
Module 'Magento_Log':
Installing data..
[Progress: 228 / 272]
Module 'Magento_MediaStorage':
[Progress: 229 / 272]
Module 'Magento_ConfigurableProduct':
Installing data..
[Progress: 230 / 272]
Module 'Magento_Multishipping':
[Progress: 231 / 272]
Module 'Magento_Newsletter':
[Progress: 232 / 272]
Module 'Magento_OfflinePayments':
[Progress: 233 / 272]
Module 'Magento_SalesRule':
Installing data..
[Progress: 234 / 272]
Module 'Magento_PageCache':
[Progress: 235 / 272]
Module 'Magento_Centinel':
[Progress: 236 / 272]
Module 'Magento_Persistent':
[Progress: 237 / 272]
Module 'Magento_ProductAlert':
[Progress: 238 / 272]
Module 'Magento_Captcha':
[Progress: 239 / 272]
Module 'Magento_Reports':
Installing data..
[Progress: 240 / 272]
Module 'Magento_RequireJs':
[Progress: 241 / 272]
Module 'Magento_Review':
Installing data..
[Progress: 242 / 272]
Module 'Magento_Rss':
[Progress: 243 / 272]
Module 'Magento_CatalogWidget':
[Progress: 244 / 272]
Module 'Magento_GoogleAdwords':
[Progress: 245 / 272]
Module 'Magento_OfflineShipping':
[Progress: 246 / 272]
Module 'Magento_GiftMessage':
Installing data..
[Progress: 247 / 272]
Module 'Magento_CatalogSearch':
[Progress: 248 / 272]
Module 'Magento_Sendfriend':
[Progress: 249 / 272]
Module 'Magento_Shipping':
[Progress: 250 / 272]
Module 'Magento_Sitemap':
[Progress: 251 / 272]
Module 'Magento_AdminNotification':
[Progress: 252 / 272]
Module 'Magento_Tax':
Installing data..
[Progress: 253 / 272]
Module 'Magento_TaxImportExport':
[Progress: 254 / 272]
Module 'Magento_CatalogUrlRewrite':
Installing data..
[Progress: 255 / 272]
Module 'Magento_Translation':
[Progress: 256 / 272]
Module 'Magento_Ui':
[Progress: 257 / 272]
Module 'Magento_Ups':
[Progress: 258 / 272]
Module 'Magento_UrlRewrite':
[Progress: 259 / 272]
Module 'Magento_Integration':
[Progress: 260 / 272]
Module 'Magento_Usps':
Installing data..
[Progress: 261 / 272]
Module 'Magento_Variable':
[Progress: 262 / 272]
Module 'Magento_Version':
[Progress: 263 / 272]
Module 'Magento_Webapi':
[Progress: 264 / 272]
Module 'Magento_Weee':
Installing data..
[Progress: 265 / 272]
Module 'Magento_CurrencySymbol':
[Progress: 266 / 272]
Module 'Magento_Wishlist':
[Progress: 267 / 272]
[Progress: 268 / 272]
Installing admin user...
[Progress: 269 / 272]
Enabling caches:
Current status:
Array
(
[config] => 1
[layout] => 1
[block_html] => 1
[view_files_fallback] => 1
[view_files_preprocessing] => 1
[collections] => 1
[db_ddl] => 1
[eav] => 1
[full_page] => 1
[translate] => 1
[config_integration] => 1
[config_integration_api] => 1
[config_webservice] => 1
)

[Progress: 270 / 272]
Disabling Maintenance Mode:
[Progress: 271 / 272]
Post installation file permissions check...
For security, remove write permissions from these directories: '/var/www/magento2/app/etc'
[Progress: 272 / 272]
[SUCCESS]: Magento installation complete.
THANK YOU
If you made it till here, I’m thankful. If you find any kind of improvement or optimisation on what I demonstrated above, feel free to drop a comment below!
Cheers!
Yeah, I did it!!!
Thanks.
Hi Khayrattee
I’ve been trying to install Magento V2 on my EC2 instance for the past two days now. I came across your post and it’s definitely the best one so far.
I’m really new to Ubuntu and Magento, and still having an issue, I followed your guide step by step but the installation isn’t going through. I’m getting “bash: bin/magento: Permission denied” ? I’ve tried googling I but couldn’t find anything about it.
I can’t describe to you how tired I am 🙁 Would appreciate it if you could help me out on this.
Many thanks in advance
Mehmet
I’ve experienced the same problem. What worked for me is adding php in front of bin/magento. Example: $ php bin/magento –backend-frontname=”admin” …
Hope that works for you too.
For solving Mcrypt extesion issue:
just after installing the mcrypt extension we can run below command to enable it:
$sudo php5enmod mcrypt
& done!
You’ve done a great job putting it all together. There is a simpler way to deploy Magento 2 on AWS: use the automated services. For example Deploy4Me supports Magento installation in a few clicks. Very strightforward and no pitfalls.
Nice article. I don’t think running git in sudo mode is a good idea. Having setup folder permissions properly you wouldn’t need to do it.
It would be great to have magento2 installation article for AWS Elastic Beanstalk 🙂
How doi install a theme after all these steps. I need to to have a e-commerce site like a fashion store or a electronic gadget store ?
Any help is greatly appreciated. ?
Great tutorial, but isn’t it better to use PaaS like Heroku or Cloudways to deploy Magento on AWS? This method is much easier and it saves a lot of time as well. Manually install on AWS might also require you to have sysadmin skills and understand AWS docs.
Hi Olivedev,
Using PaaS as you mentioned are managed solutions and as such are for people that do not want to do everything themselves.
The example I illustrated in my article are for those that like to do some side DevOps (dev with sysadmin skills) on the side.
cheers
Very good guide!
I got stuck here tho:
File/Folder Permissions & Owner
sudo find . -type d -exec chmod 700 {} \; && find . -type f -exec chmod 600 {} \;
Apparently the bash line is invalid – needs to be updated 🙁